Favourite Craft Ideas - Other Ideas
Some activities below have worksheets
that you can see by clicking on the worksheet icon: ![]() .
.
To get the best results when printing worksheets, make sure your left and right margins are set to no more than 10mm (use File, Page Set up to adjust this).
Rocket
Firework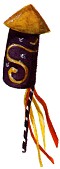
You will need:
Half of a cardboard tube from inside
a kitchen roll
Coloured paper
Coloured card
Yellow and orange crepe paper or tissue
Glue
Glitter
Either some tape or a small stapler
Cut a piece of coloured paper 12cmx14cm, this allows
for a 1cm overlap.
Decorate the paper with swirls of glue and sprinkle
on some glitter until the glue is covered, shake off
any surplus, and then leave the paper to dry.
While the glue design is drying, cut out a piece of
card with a diameter of 10cm then cut out a segment
as shown and glue the two straight edges together to
form a cap.
Glue the decorated paper around the card tube overlapping
it slightly, then using scissors snip down about 2cm
all around one end of the tube and bend these flaps
inwards.
Put some glue on to these flaps and place the cap on
top, hold it in place until it has stuck.
Either tape
or staple the straw to the inside of the bottom end
of the tube. ( You can glue it, but it is quite difficult
to hold in place).
Cut out 4 or 5 streamers (1cm x 15cm) from the crepe
or tissue, and glue them to the same side of the
tube as the straw.
To finish off tuck a scrunched up piece of crepe or
tissue inside the tube to fill the bottom.
You could make a firework mobile by making several different coloured fireworks and hanging them at different heights from two crossed wires.


Making
play sunglasses 
You will need:
Coloured card
Coloured cellophane
Glue
Paint or crayons
Glitter
To make the sun glasses you will first need to decide on the shape of the glasses you want eg oval, square or maybe heart shaped. The sizes shown to the right are for a child about four years of age but can easily be adjusted to fit a smaller or larger child.
You can make the glasses out of one length of card as shown top right. To do this you will need a piece of card 36cm x 4cm.
You may prefer to make the glasses using three pieces of card, allowing you to position the sides of the glasses differently. To do this you will need to cut one piece 12cm x 4cm and two pieces 13cm x 2cm.
Before cutting the glasses out of the card, make a template out of pape. Fold the paper in half as shown before drawing your design on one half and then cut out the design with the paper still folded to ensure the glasses are symetrical.
Cut the paper the same size as the card, fold in half and draw out the shape of the glasses you want using the sizes shown as a guidline.
If you are using three pieces you will only fold the front of the glasses, and make a template for one side of the glasses. With the dimensions above, 1cm has been allowed on the side for gluing onto the glasses front.
Once you are happy with the design, use the template to draw around onto the card and then cut out the glasses. Decorate the glasses, glue on the sides if appropriate and then cut two pieces of cellophane to fit in the rims and glue on the back.
These glasses are obviously just for fun and children should not wear them for protection against the sun.


Making
a template


Make the glasses more fun by cutting different shapes
Nature Pictures
Autumn is a great time of year for nature walks and collecting things like leaves, twigs and nuts. The children can use the collected items to create some 'Nature pictures' while you are outside. The pictures can be as small or large as you like depending on your collection. Why not explore patterns using leaf colour and shape.
Let the children take some photographs of their artwork to be displayed inside. A digital camera can be great for this.

Autumn Leaf Mobile
You will need:
Dark brown card
Yellow, orange, red, brown tissue paper
Glue
2 sticks or a small hoop
Cotton or thin string (to hang up the finished mobile)
A collection of leaves to look at and discuss regarding different shapes and colours.
Before actually making the mobile look at some leaves and discuss the shape and colours.
Either using the template sheet or your own leaf design, draw around each shape and cut out the the leaf frames from the brown card. The children could do the cutting but this would obviously depend on their scissors skills.
For a neater finish you could cut out 2 frames per leaf so that the glued tissue paper edges are hidden between the two frames.
Once the frames have been cut out, choose the a piece of coloured tissue paper for each leaf and cut out a shape larger than the frame.
Put glue around the frame and then carefully lay the tissue paper on top. Let the glue dry before trimming off the spare tissue.
If adding a second frame this can be done now.
When the leaves have all been made ,attach varying lengths of cotton and hang them from a small hoop or a couple of sticks tied together as shown.
To make the leaves look like they were really falling through the air, transparent fishing line could be used to hang the leaves.

![]()

Autumn Weaving
This is great activity to follow a walk in the autumn.
You will need:
A large Hoop (The sort used for physical activities)
Brown crepe paper
Glue stick
A ball of
Brown wool or thin string
Wool, ribbon, thin strips of material in colours that you would associate with Autumn such as yellow, orange, or brown
Leaves, twigs or similiar things that you might find on a nature walk
To make the basic frame you need to cut some strips of brown crepe about 4cm wide and as long as possible. Wind a piece of crepe around the hoop overlapping each wind by about 1cm, this helps to keep the crepe in place. When you need to start a new piece secure it in place with a spot of glue before continuing to cover the hoop. The number of strips you will need will depend on the length of the strips. When the hoop is covered secure the end with another spot of glue.
Now you need to string the hoop and make a basic weaving framework. Using either brown wool or thin string tie the end tightly around the hoop and then tie it again on the opposite side of the hoop to form a diagonal, cut the wool/string. Tie the next piece about 4cm along the hoop from the first and tie it on the opposite side again 4cm away so the wool is parallel as shown in the diagram. Repeat until there is no more room on that side then match the other side of the diagonal in the same way.
You now need to make the cross strings. these are attached in the same way but are woven over and under the first set of strings at 90 dgrees the aim is to end up like the strings on a tennis racquet.
Start again in the middle and after tying the first piece of wool/string to the hoop weave it over then under, then over etc the first set of strings and then tie off. Add the second string, this time going under first, then over, then underto the end. Continue to add the other strings alternating the weaving so that the strings eventually form a mesh. The children usually love helping with this.
When this is complete you are now ready to weave into the frame the ribbons, strips of material and wool. The lengths of these materials can vary and they don't have to be woven all the way across they can go back on themselves to form a block of colour. Several children can be working on the weaving at the same time and of course you can have several being made at the same time. Leaves and twigs etc can then be added by tucking them in amongst the woven materials.
The hoops can be displayed on a wall or hung, if you choose to hand them you may want to add leaves etc on both sides of the weaving.


facebook