![]()
Painting Ideas
Blow | Bubble | Mirror | String | Potato prints | Hand printsBlow painting

You will need
Paper
Straws
Runny paint
Make up some different coloured runny paint and put a couple of drops of the same colour onto the paper. Using the straw, blow the paint in all directions until it won't go any further.
By turning the paper round, the paint can be blown more easily in different directions.
Repeat using different colours to get a variety of effects. It's really good to use primary colours as it demonstrates nicely how colours combine to make different colours (eg red and yellow join to form orange).
Bubble painting
You will need
Paper
Containers with wide tops (eg plastic cups, yoghurt pots)
Powder or liquid paint
Washing-up liquid
Straws
Put a squirt of paint and a squirt of washing-up liquid into one of the containers. Add a little water and mix well until the mixture is runny enough to blow bubbles with. Using the straw, blow into the mixture until the container is so full of bubbles that they rise above the top rim.
Quickly take a piece of paper and lightly touch it onto the bubbles. As they touch the paper, the bubbles will burst and leave an imprint on it.
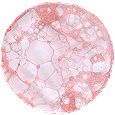
You may need to try a few times until you get a good density of colour. However, note that the imprint will never be really dark.
Mirror image painting
You will need
Paper
Paints of various colours
Fold a piece of paper in half and then open it out again. Onto the paper, particularly around the fold line, put some different coloured drops of paint. Keeping one side of the paper flat, fold the other side over on top of it.
Using the palm of your hand, press the two sides of paper together, smoothing from the fold outwards to the edge.
Carefully open the paper to produce a painting that should be a mirror image about the fold.
Depending on the result, you could add more colour and repeat the process.
With a litle help children can produce wonderful butterflies by cutting the paper to a butterfly wing shape before adding the paint. A body and antennae can be glued on afterwards, with the paper forming the wings.
String painting
You will need
Some pieces of string about 0.5m to 1m in length
Paper
Paints of various colours in pots
Fold a piece fo paper in half and then open it out again. Put a piece of string into a pot of paint until it is covered completely, leaving a few cm at one end to hold onto.
Lift the string out and gradually lay it on the paper, finally leaving the paint-free end sticking out over the edge of the paper.
Fold the other side of the paper over on top of the string. Hold down the top half of the paper onto the string and get a child to pull the string firmly, by holding the paint-free end, until it is completely free of the paper.
Open out the paper and admire the results.
Use different colours for a variety of effects.
Printing
 Almost
anything can be used to print with, cotton reels, corks, fruit,
vegetables, hands, fingers, even feet.
Almost
anything can be used to print with, cotton reels, corks, fruit,
vegetables, hands, fingers, even feet.
For small prints using cotton reels etc, it is sometimes easier
to pour some paint onto an old saucer or something similar and
then put a thin piece of sponge/foam on top of the paint. When you
then press down on the sponge with your reel the paint seeps through
the sponge and gives you just the correct amount of paint to make
a good clean print rather than overloading the reel and it all ending
up very messy.
A top up of paint is just needed under the sponge every now and
then.
Potato Prints
Great effects can be achieved by printing with potatoes. The potato, once cut in half, can then have the flat surface cut into all sorts of shapes or patterns ready for printing. (The key to good potato prints is to make sure the cut surface is flat.)
 To
create the printed pattern shown on the right, cut a potato in half
and then cut out a different design on each half. Square up some
paper, making sure the squares are big enough to take one print
and then print using one half of the potato and one colour. When
the first prints have dried repeat using the other half of the potato
and a different colour.
To
create the printed pattern shown on the right, cut a potato in half
and then cut out a different design on each half. Square up some
paper, making sure the squares are big enough to take one print
and then print using one half of the potato and one colour. When
the first prints have dried repeat using the other half of the potato
and a different colour.
The potato halves can be washed off and used again with a different colour combination.


Hand Prints
Hand prints are also very versatile and if you are working with a group of children they can be used to make lots of different pictures for displays.Most children love making hand prints however if you have a child who is reluctant, just draw around their hands cut them out and then let the child paint them.
All you need is paint, some hands and somewhere close by with plenty of soap and water!
 A simple idea for Autumn is creating a tree with the leaves made from handprints in autumnal colours, orange, yellow, brown etc. The children could be encouaged to mix the paints to match the colour of collected leaves from perhaps a nature walk before printing their hands. When dry the leaves can be glued onto a trunk, either painted, cut from paper or the children could do some bark rubbings which could be then cut to shape
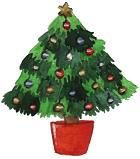
Shown here are three more examples of how you can use handprints to great effect.
 |
 |
 |
| The Christmas tree has a bauble for each pair of handprints, which could show the child's name on it. | The dragon is great to make for Chinese New Year. | The sunflower can be used a height chart. |
facebook